
Leather
- Dec 4, 2020
- 13 min read
Updated: Dec 10, 2020
From the beginning I was most worried about making a leather mask. I have long wanted to work with leather but never did because I knew it was a different skill set complete with different tools. Through my interviews I was encouraged to go ahead and try it, that it’s difficult but manageable. I was given the advice to get a belly, a less expensive cut that would have room for multiple masks. I ordered a shockingly cheap one from Tandy Leather at $20. When it arrived I was very surprised by the thickness and hardness of it, it seemed dubious that this piece would ever be moldable.
At school, I was eventually able to connect to someone who does leatherworking. He had never made a mask but had made bags and wallets and other leather goods. I told him about my mask and that I had a belly that was super thick and he told me I needed a shoulder at around a 4oz thickness to be doing such a thing. He also pointed me to some videos and let me borrow his tools. Because of quarantining complications I had a short and immediate window to buy the shoulder piece so I drove to the nearest Tandy and exchanged the belly for a shoulder.
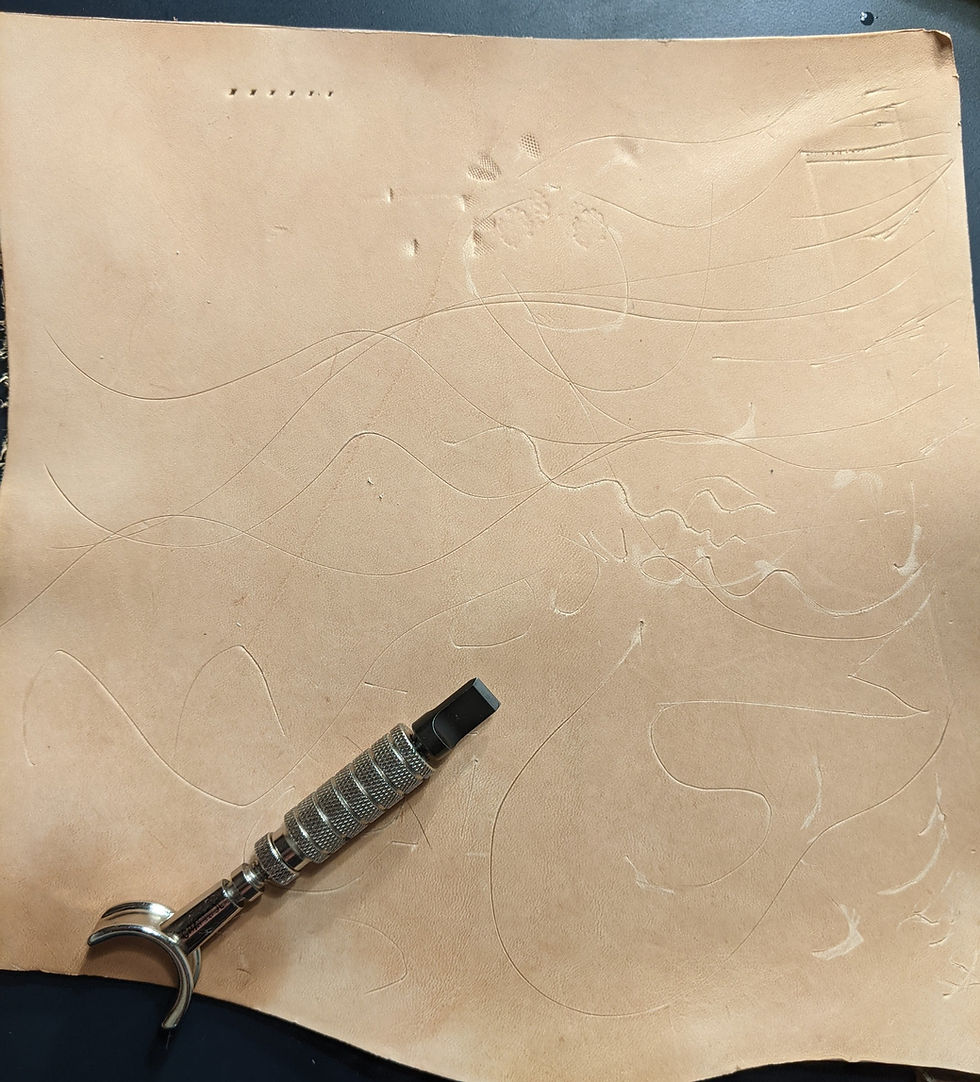
I was excited to work with the leather and decided rather than paint over it, I would give it grooves and curves much like some of Jim Henson’s other work, the Mystics from The Dark Crystal. I started learning how to use a swivel knife, a sharp v-shaped blade on a unique swiveling handle. I watched a bunch of videos and found the blade I had borrowed wasn’t doing so well and rather than buy a sharpening stone, I bought myself a swivel knife for about the same price.

Once I received it it glided nicely over the damp leather to make cuts into the leather. It’s a very fun tool to use and not one that I have even begun to master. It’s control is different to any other cutting implement I have used and I hope to make more attempts with it in the future. I was told I would need to carve it before molding the leather, but I also found videos of people carving on a form, so I took a small piece of leather and soaked it in water with shoe stretch (a tip I received in my interviews) and attempted to form it onto my mold. I was horrified to find it was not really working at all. The piece moved a bit, but there was definitely no way that it was going to really stretch over the face. I panicked and returned to researching.

After digging through link after link looking for the right information (have I mentioned how difficult it is to find relevant mask research during a masked pandemic?) I finally was looking under “wet forming a commedia mask” in my searches and came across a process of someone making a Pantalone mask in Italy. This website didn’t have all the information I needed but it had enough to let me know I had been working towards the wrong direction and was likely in over my head. It also recommended a belly piece because (as I finally learned) the belly has a unique stretchiness to it that you can’t find on a piece like a shoulder, which makes sense if you think about a cow’s body. I reached out to the woman who had originally suggested a belly piece and had given me lots of leather information to ask if she was able to meet at all, but she is a professor and was in crunch time with her own students. She did, however, suggest a book with step by step instructions, The Prop Builder’s Mask Making Handbook. I ordered it immediately and regretted not asking “do you have any books for crafting that you recommend” to my interviewees. I went to Tandy again and this time picked out a much more expensive belly piece. The second I touched it it was so obvious to me that every other leather choice had been dead wrong, this leather felt supple and right for forming.
Once the book arrived I was thrilled to read the clear and well explained steps to make a leather mask in a traditional way. One of the toughest parts of this thesis was that I had no guides to follow, I was making intelligent choices from the research I made, but not once was something laid out so nicely for me. In reading through everything I realized there were a few big hurdles to overcome before I would be leatherworking. The first problem was that the tools required are very unusual; a “sticketta” and a cow’s horn hammer. The book does not give modern alternatives to these two tools, it says you need to make them yourself. At this point there was no way I had time to make tools so I looked for other options.
For the cow’s horn hammer (which is literally a horn that you affix onto a heavy stick and then sand the point down to be smooth) I found an embossing hammer for metalwork with a similarly rounded but still pointy end. For the sticketta, a slick piece of wood in a teardrop-like shape that’s completely smooth, I figured I would use my thumbs (I had been warned they would hurt) and whatever else I had around. I neglected to read the part about the sticketta sitting in linseed oil for a week before working with it. This would come back to bite me.
A bigger issue was the kind of mold leather requires. Traditionally, leather mask molds are wooden which serves two purposes; you can hammer the leather into the wood in the back and the wood absorbs moisture from the leather which is essential in the drying and hardening process. The book had a way to get around it, but it required making multiple molds out of a variety of materials and that didn't seem feasible (see Fosshape discussion of molds). I spent a good deal of time thinking about what else I could use to form this mask, I did deep dives looking for anyone wet forming masks in a non-traditional way without much luck. I tried to think about other materials I could potentially stretch on and hammer into, and then I looked up at my wall.
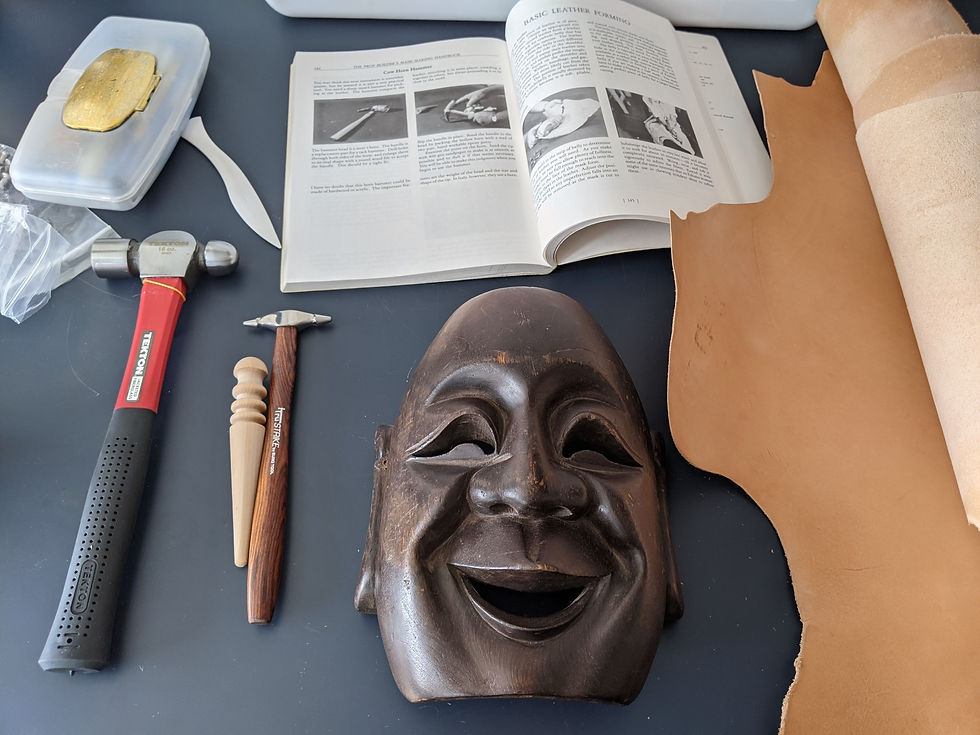
For some years now I have been the proud owner of two wooden masks representing comedy and tragedy. I had long admired these masks that my grandparents bought in Japan in the seventies and when my grandma moved recently she gave them to me. I spoke with Ellen about it, we both decided that in this case it was better to use this pre-made “mold” so that I could get to learning the material instead of spending so much time on the mold itself. After calling my grandma and making sure the masks weren’t extremely special (they weren’t, the only thing she knew was that the darkness of the wood comes from it being buried underground) I hoped that the craftsperson who carved this mask would think it’s cool it was being used fifty years later for another craft.

I cut a big enough piece of leather to fit around the comedy mask and soaked it in very hot water with a bit of shoe stretch for ten minutes. I then twisted and pulled and massaged the wet and extremely pliable leather.

The direction in the book is the best direction I have ever read: “Knead it with some of the same intensity that an Eskimo woman might use in chewing reindeer skins to soften them.” So needless to say, I worked the leather as much as I could.
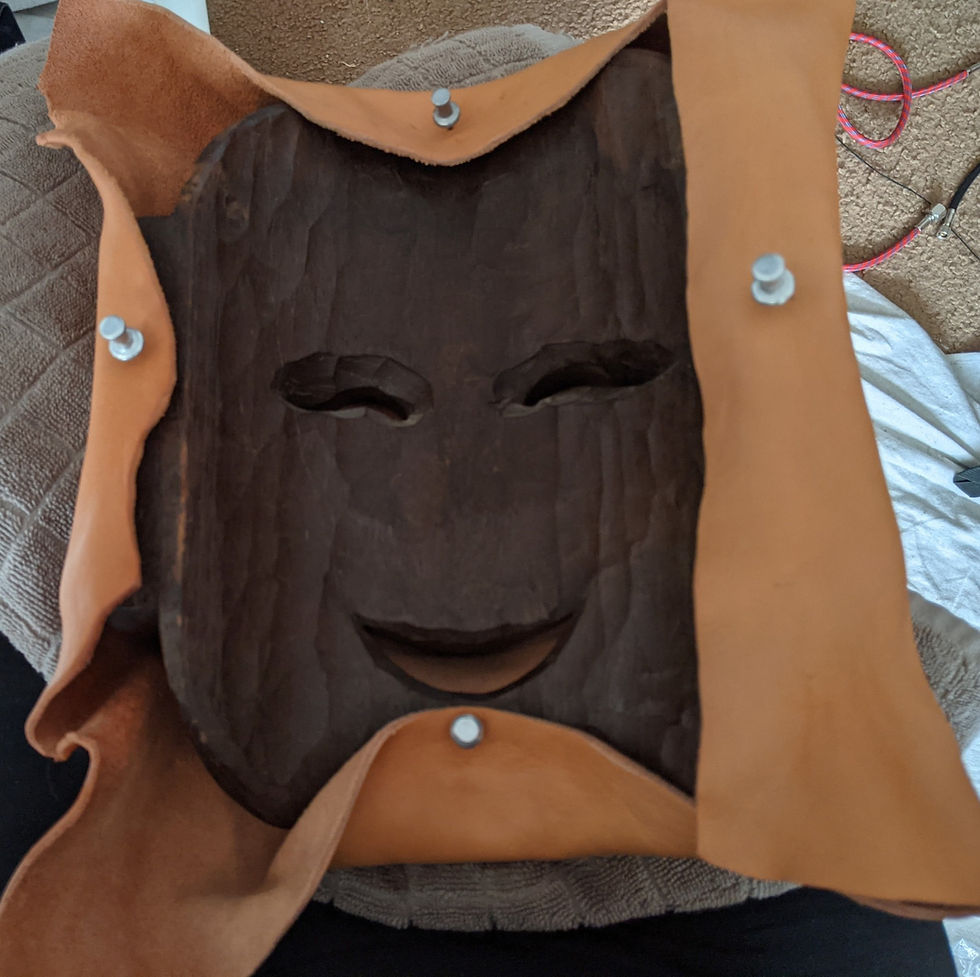
The next step was to pull the leather to the back of the form and hammer it down, leaving enough material for the depth of the facial features in the middle. Later I would find I did not leave enough at this step. I nailed down four corners and then worked my way around the edge, cutting darts when needed to make sure the leather would lie flat. After that it was time to work the features of the mask.


I first used my thumbs to push the leather as far into the grooves as I could, it stretched less than I anticipated and I hoped it was getting deep enough. I also found that the tools I had hoped to use; a point turner, a wooden handled awl and edge slicker, were not working very well. The dryness of the wood was catching on the surface of the leather and causing tears. I pushed with my thumbs as much as I could and let it sit for just a bit, hoping the next step of hammering would push the leather further to where it needed to go. I now know that a proper sticketta (or those other wood tools soaked in linseed oil) would’ve made it far more possible for me to push deep into the grooves and get a clearer design.


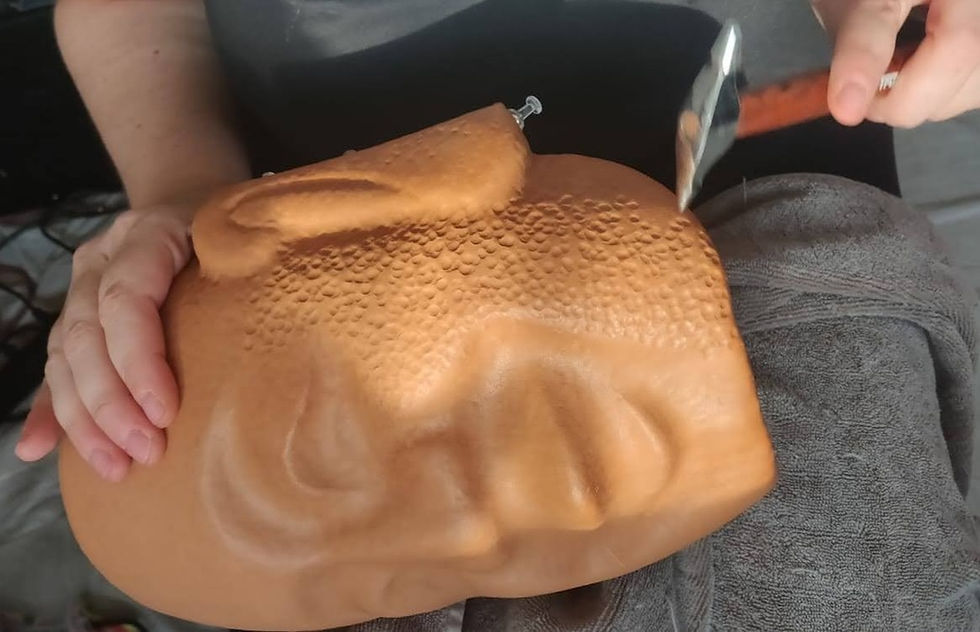
Hammering was a lot of fun, it did really stretch out the leather while compressing it closer to the mold to make the lines more defined. I would hammer one section at a time and then use my thumb to smooth the area. This is another time in which I realized my lack of sticketta was problematic. My thumbs worked relatively well, but I needed something with force to push the walls of the dimples I made with the hammer fall flat. I rolled the edge slicker over flat areas and that worked relatively well but eventually what worked best was the handle of my embossing hammer.


By the end of the hammering process I became pretty adept with holding the end of the handle with one hand while holding the hammer tip with the other and sliding and shimmying the smooth handle over the leather to flatten it. Eventually I became good enough that I was able to use the edge of the end of the handle to get into harder to reach spots. I can imagine having the right tool would have made this all easier. I wasn’t able to completely flatten all of it because of the tight angles but I got it as smooth as I could. The book also said to “polish” the mask with the sticketta so I used the handle once more and tried to rub a nice sheen into the leather. I also used my hands as I know the oils in our skin are great at working leather and adding shine. The forehead seemed dry and unpolished but after working it with my palms it had a good shine on it.
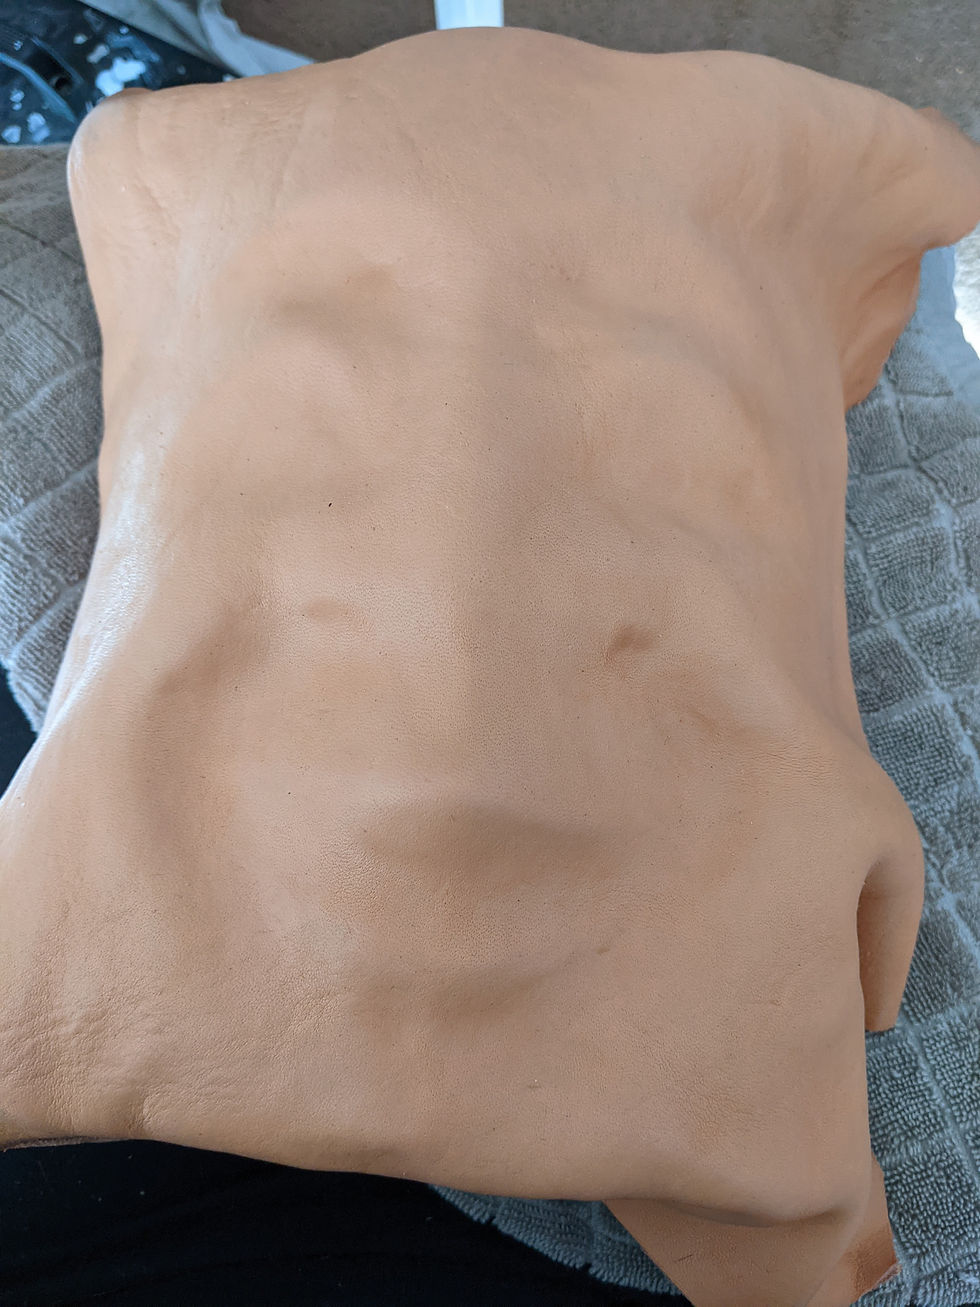
I let it sit for a day and half before touching it, when I got ready to take it off I first trimmed the tabs on the back down to ¾ inch long and started shaving off layers on the tabs to make them as thin as possible. The reason for this is because the tabs make a great folded area to encase the wire. I was using my skiving knife to do this and it was going ok until the sharp knife cut into the wood of the original mask. I was ok with maybe a little wear happening on the mask, but I didn’t like the idea of cutting into the wood, messing up the stain and chipping pieces of it off. So I pulled it off. I was shocked by how hard my mask had become! So sturdy and tough even without a wire.

I also saw pretty clearly that I hadn’t really gotten deep enough into the grooves, the backside of the leather picked up the wood stain in all of the areas where it actually made contact which left an adorable negative face print. I tried to continue skiving, but without the wood beneath it it was very hard to get enough pressure to make the tabs thinner. The book offered another way of finishing the edges without wire if the leather is sturdy so I decided to opt for that, rather than risk further damage to the wooden mask.

For this technique I needed to trim down the edges to be beveled and slicked. I don’t know what tool I should have had to cut leather, but craft scissors were not it. They were mostly strong enough, especially down by the handle but they were too long to deal well with the tight turns the mask takes. I had a lot of difficulty cutting it out and some of the edge was jagged, so I used the dremel on a sanding attachment to even out the lines. While this did even out the lines it also made a lot of leather fluff on the underside.

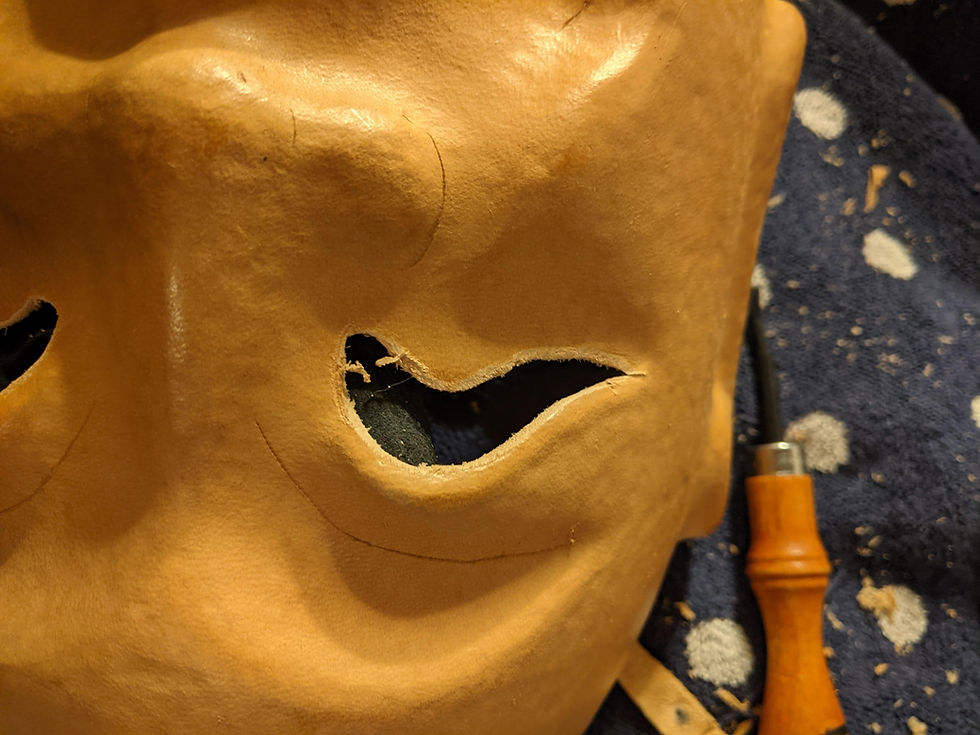
When it came to cutting out the eyes I was terrified. The cutting had not gone so well and it was a miracle I didn’t have any scratches on the outside from being so rough with it. I tried to find guidance in how to cut out the eyes but the guidance was essentially to have a die in the right shape to stamp it out. I took a new exacto blade out and used the lines on the back to cut into the mask slowly and carefully. My first eye went pretty well, I was able to control just the tip of the blade and move it in and out smoothly. For some reason the second eye did not happen so nicely and the cuts were a bit more jagged. I went along the back side with the dremel a bit, but it was altogether too scary for me to bring it into the eyeholes. I beveled the outside as best as I could and hand sanded away some of the fluff. For both the eyes and the edges the burnishing comes after dyeing, so that was the next step.


I looked up videos about different ways to apply dye and was pleased to see that an airbrush was highly recommended. I knew I wanted to shade and highlight the mask so I thought it would be cool to dye the mask shading instead of painting it.
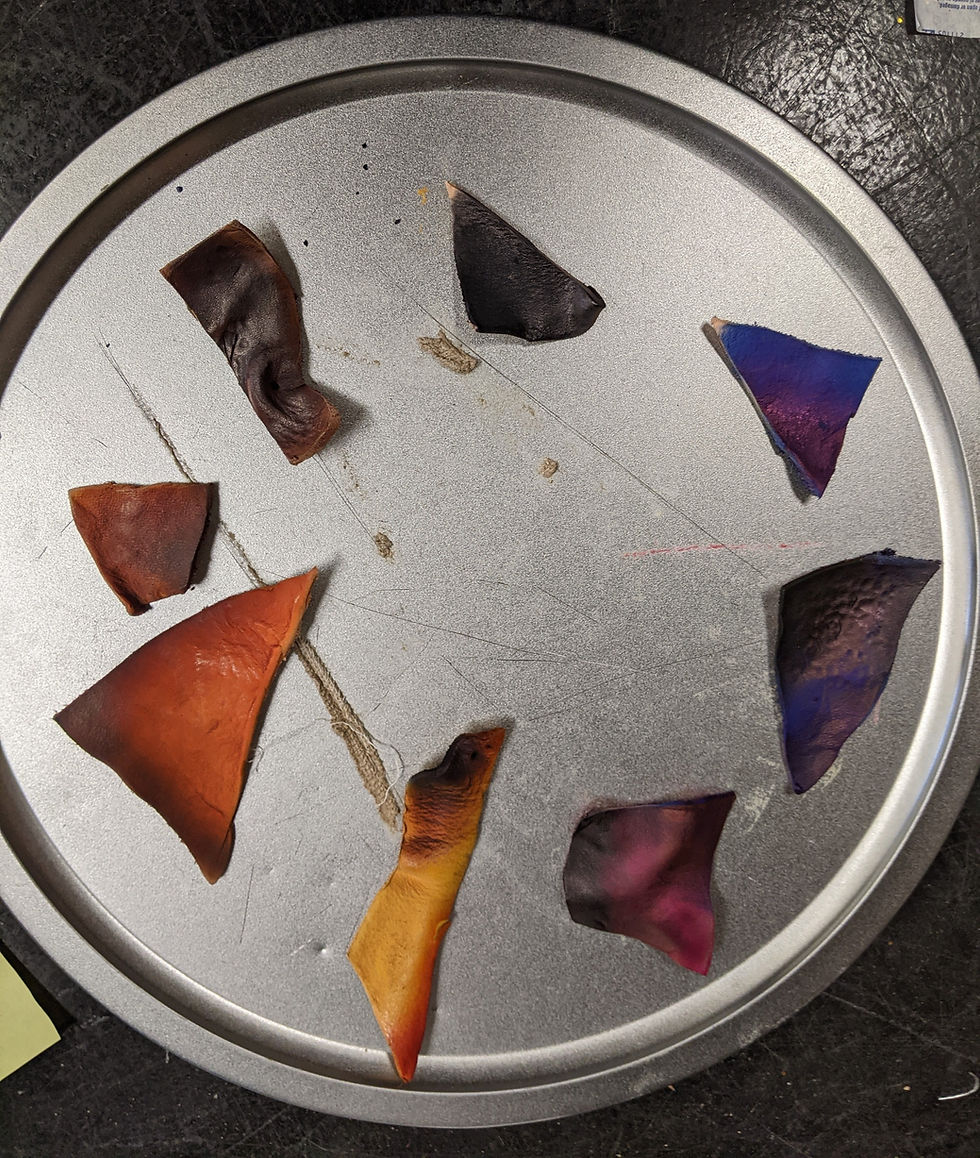
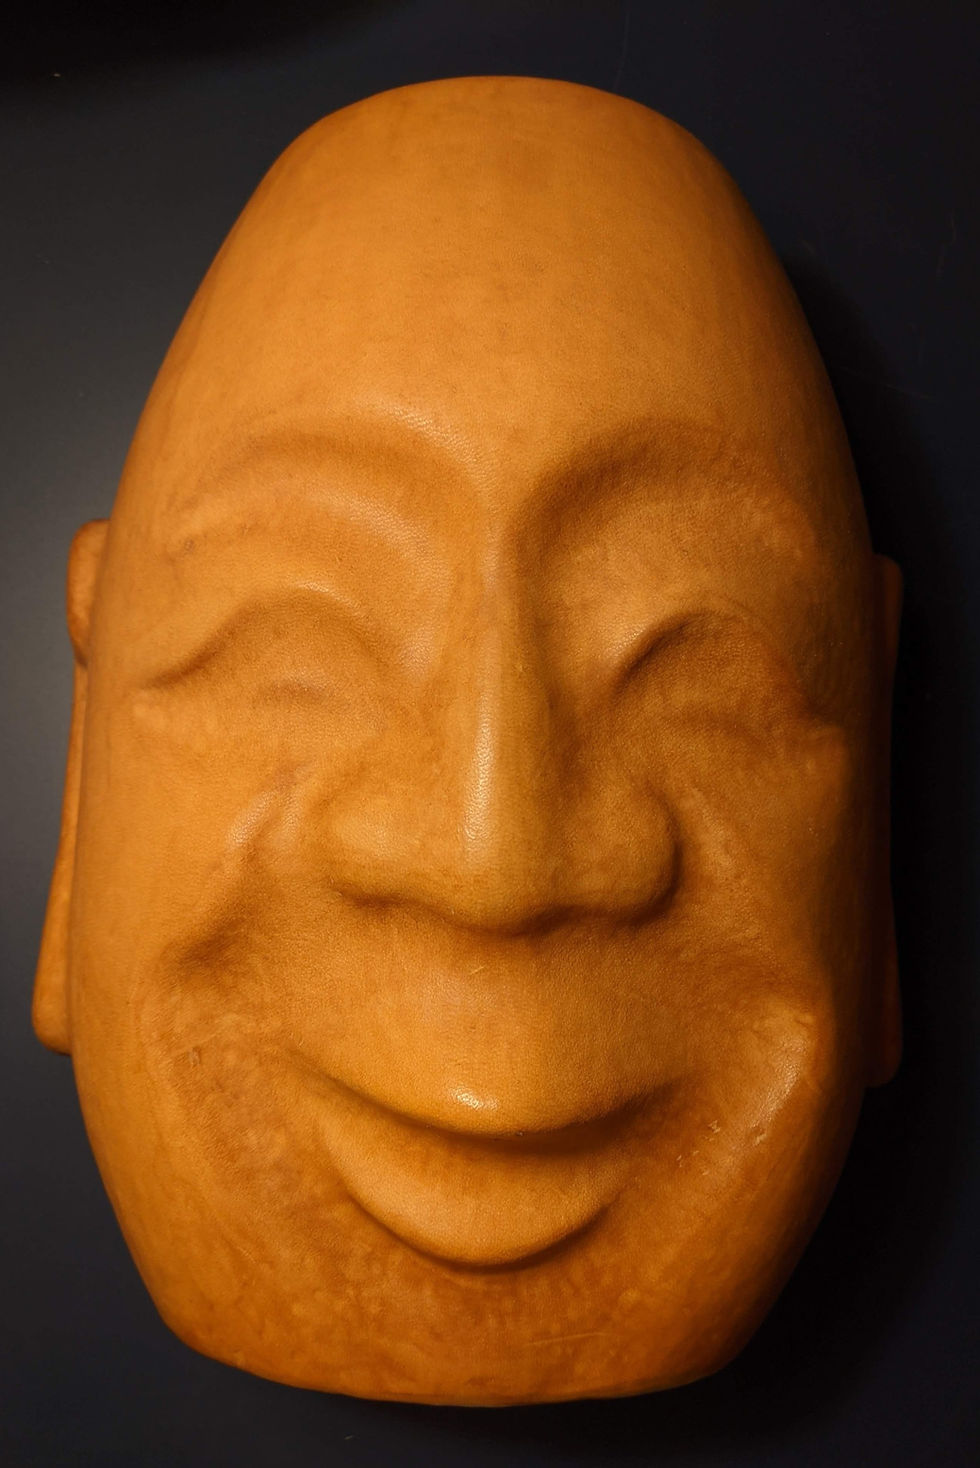
I took some of the scraps I had cut off of the back to make some dye samples. I wish I would have hammered the tabs at the back as well to give me the more polished surface that my mask actually has. I took every leather dye we had in the shop and made swatches. On top of some of the swatches I also ran another color along the edge for shading. This was my first real shading with the airbrush and I was excited by how good it looked. After they had dried I decided that I liked an orange wash with light brown and cordovan shading. I also liked some lighter colors, but I was concerned that the areas of hammering that were not completely flat might be accentuated in a light color.
I airbrushed the whole mask in orange, trying to do it evenly. I found I was a bit impatient and would get too close or pull back too hard on the trigger, something I would continue to learn to control. Immediately it was clear that highly polished areas, like around the ear, became a deeper tone of orange. This didn’t worry me too much though as I was already planning on adding darker colors in these shaded areas. After I got a nice even orange coat I cleaned out the airbrush and put the light brown in. I went around the edge of one the side and ears and thought the shading looked great, then I went for the top edge, angling my airbrush a little bit and DISASTER STRUCK!
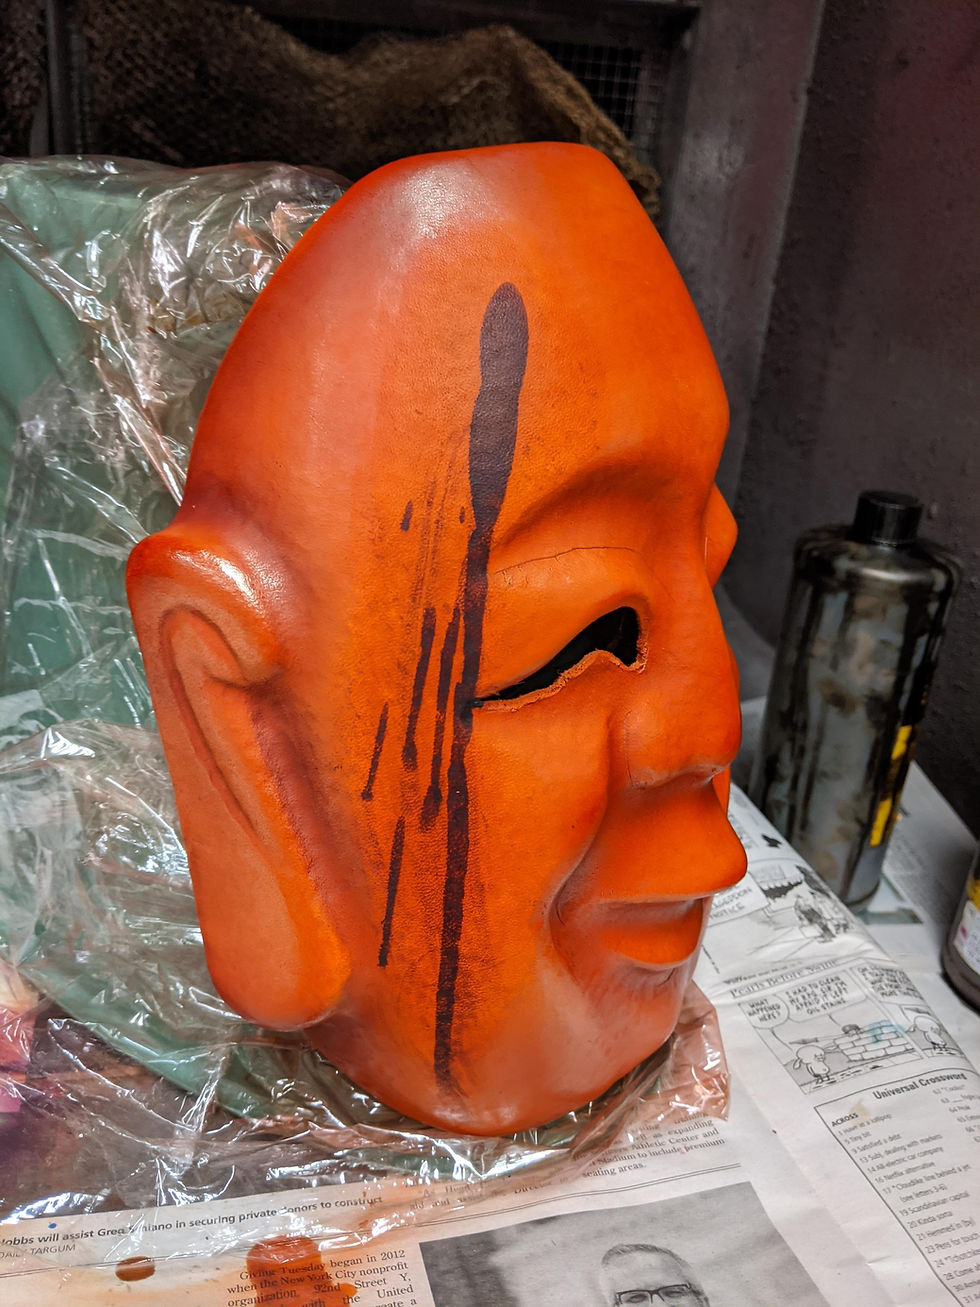
The dye poured out of the airbrush cup and all over the right cheek of the mask. I ran into the next room to get help and advice from Ellen, we tried using rubbing alcohol to pick up the dye, but it only lightened it a bit and smeared it around. I really had no hope that it was ever going to come out, the leather absorbs the dye beautifully. After discussing the options I decided that I was just going to paint the whole mask that dark. It was a sad decision to have to make, it’s not at all what I had envisioned, but it was the only way I could save it from my mistake. As I worked on that side I realized I didn’t actually have to let the whole mask get that dark, just the sides. I layered on lots of dye; the difference between a fine misting of dye and drops of direct dye is huge so I had to do many layers of airbrushing to get it to match the drops. After I hid the mistake I went to the other side and made it just as dark and was pretty impressed with how much was still light in the features. I then used the brown (I had originally wanted to use three shades, but after such heavy applications of the brown I decided not to muddy the waters) to get into the shaded areas of the features, getting areas as dark as the side to make it all match. I found the brown on top of the orange made a nice mahogany color so I passed the airbrush over the entire mask several times. In the end I think it came out really well, even if it is a much darker mask than I had intended.
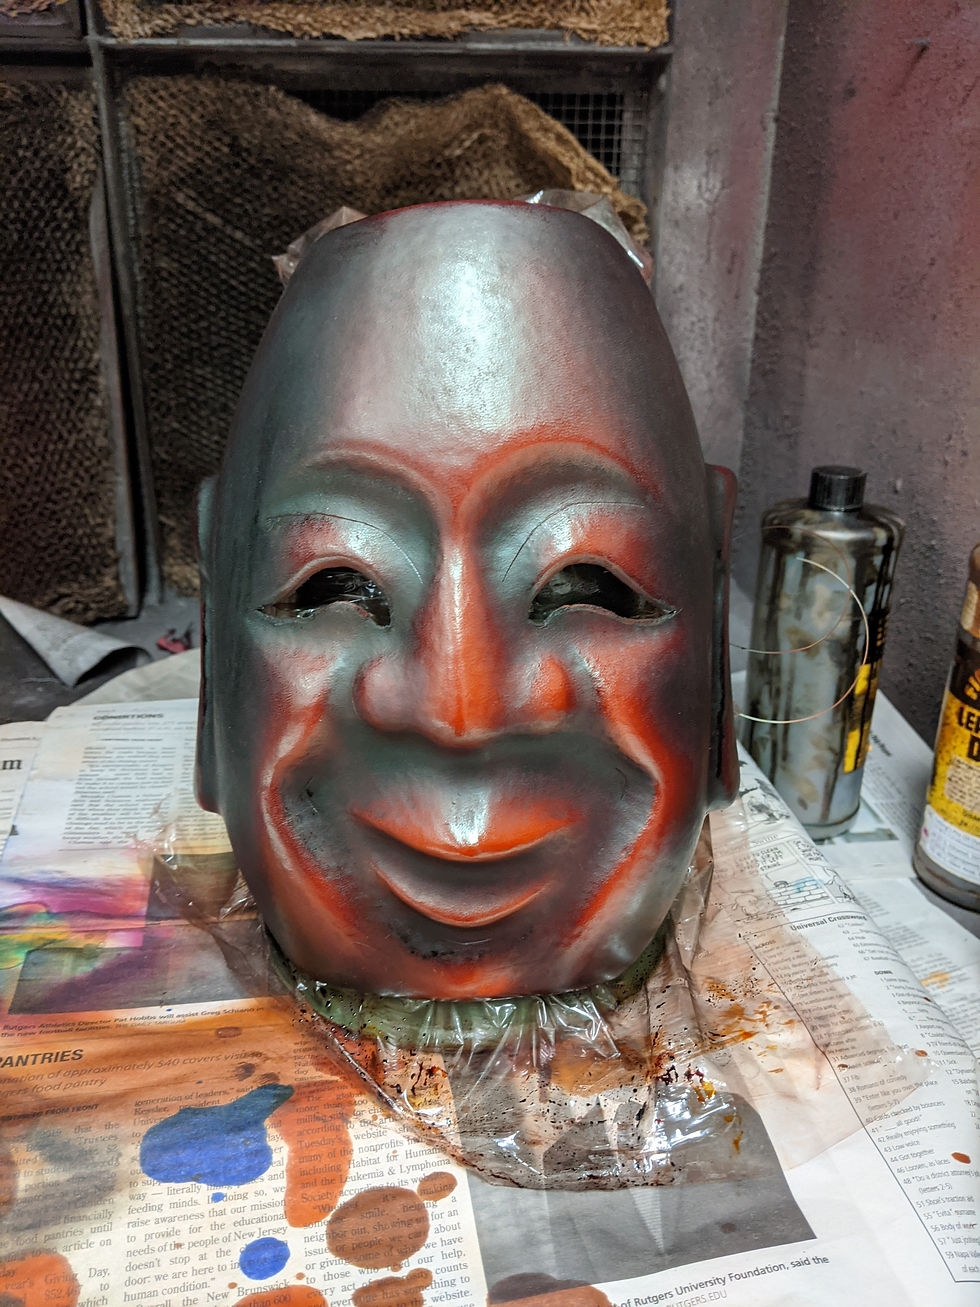
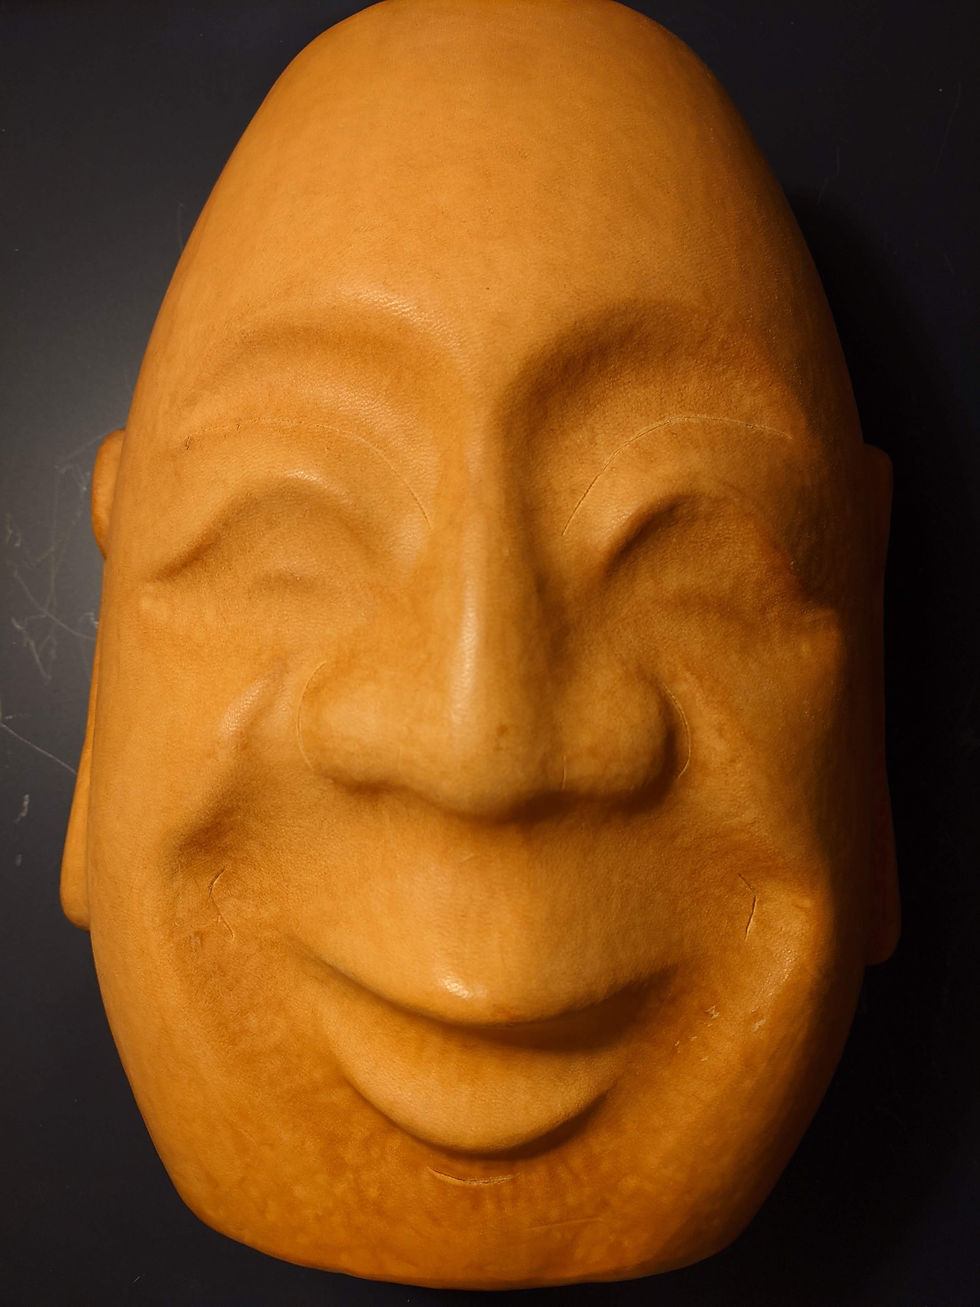
After the dye had set it was time to burnish the edges. I did this with a piece of beeswax and an edge slicker. The first step was to rub the beeswax along the edge, creating enough friction so that the wax melts into the leather a bit. Then the edge is rubbed with the edge slicker that drives the wax in as well as rounds a skived edge. I was unable to skive the inside of the edge, so it mushroomed a little bit towards the inside, but its all tucked away and not noticeable. When it came to the eyes I used my fingers as best I could to rub it in as the tool was too big. After burnishing, I polished the whole mask with a neutral polish (though I will say it left a slightly blue tinge) and then buffed it. The book also recommended lacquering the inside, but I didn't have any lacquer and I've seen plenty of raw insides on leather masks so I didn't do it.


Because these masks are going to be transported often, displayed and not actually go on stage I had opted for very simple elastic bands to keep them on the head. However, if this was actually going onstage I would be inclined to affix a pair of glasses with the lens taken out to the backside of the mask so that putting it on would only mean putting on a pair of glasses. I think it would be effective for this mask because it’s so oversized and this would keep it snug to the face. What I did was barge two strips of leather onto the inside of the ear and ran the elastic through that, which worked nicely. This mask was really difficult to photograph and I hope someday to take better pictures with a good camera and the right lighting.


Once I was actually working with the right leather and in enough of the right way, working with leather was enchanting. Many of the artisans I interviewed got an almost wistful look in their eyes when talking about leather, they all liked working with it and wished they had more chances to do so. The feeling in the hands while working leather is really wonderful, especially when I’ve been working with all of these high-tech materials, it’s like touching a silk velvet or a fine muslin, it's a rich material with history and importance. The hammering and smoothing, even though I had the wrong tools was lots of fun and I was so impressed with the way the leather conformed to my hand. I also enjoyed the sampling I did in the shoulder leather with the swivel knife and will absolutely be learning more about how to use that tool. I will also try wet molding again, I think the end effect of it is extremely beautiful and luxurious and I now have enough belly leather to make at least five more masks!
Comments